 ホーム
>>
ヘッドライン
>>
メイン
ヘッドライン
坂東市にかかわる最新ニュースをご紹介
| メイン | 簡易ヘッドライン |
 |


|
現在データベースには 7876 件のデータが登録されています。

|
おそばせながら新年あけましておめでとうございます。本年も宜しくお願いいたします。そして1月5日小桜舞子さんのキャンペーンを行いました。毎年お正月明けには舞子ちゃんに来ていただき午後1時からと3時からの2回行わせていただいております今回も熱いファンの方は勿論のこと、大勢応援に来てくださいましてありがとうございました。...
|


|
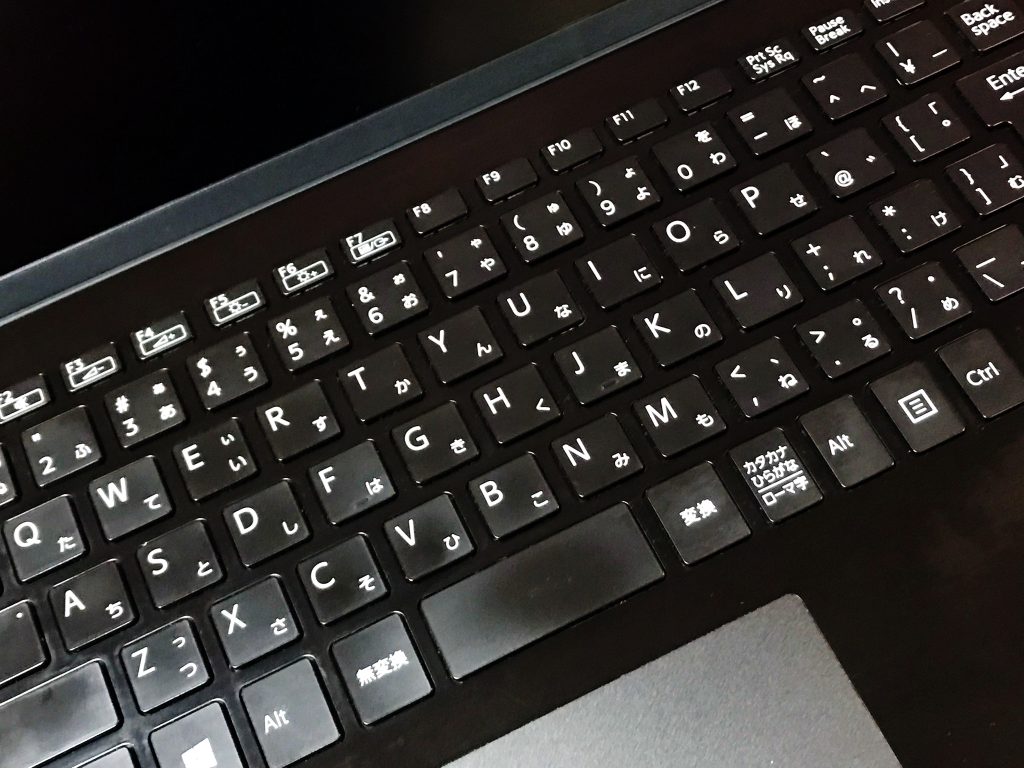
68000円 →? 50000 円(※在庫処分) ギャラリー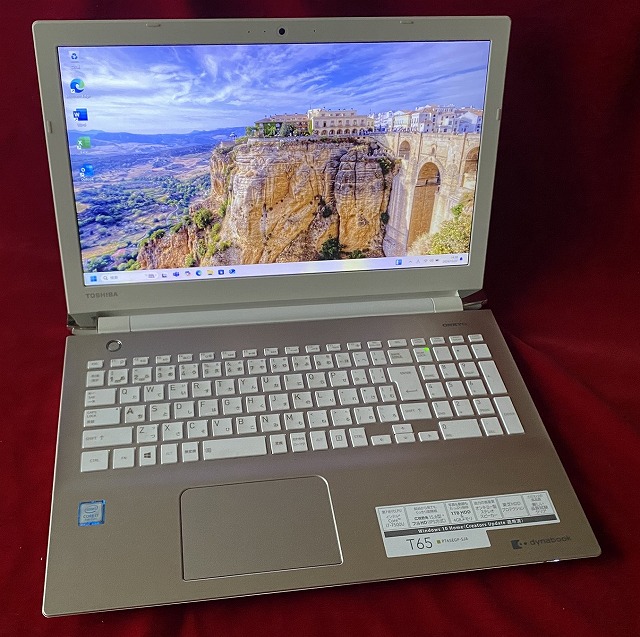   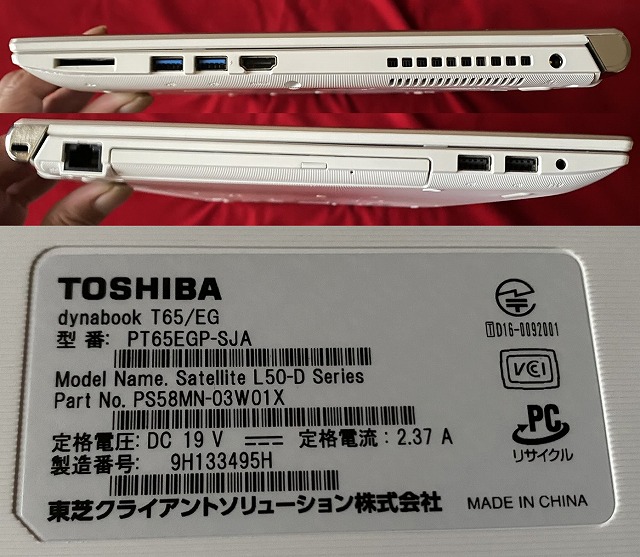 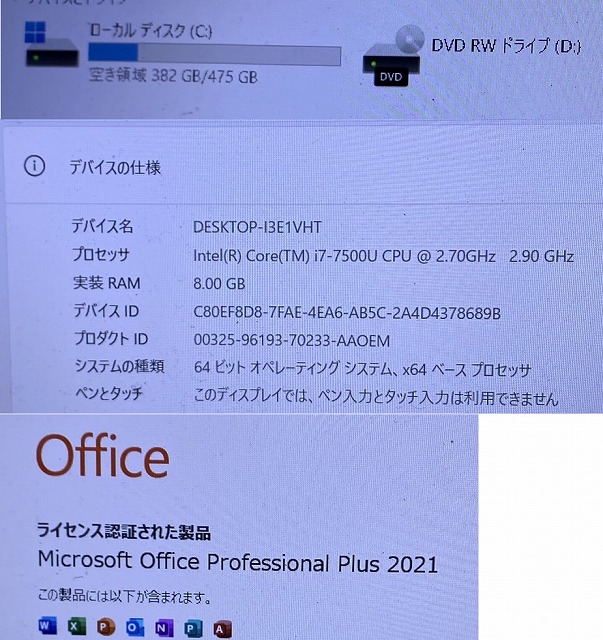
Intel Core i7プロセッサー&メモリ8GB搭載で、動作も快適♪ 天板などに傷があります。
お問合せ※商品タイトルを「題名」にコピーして送信してください [contact-form-7]
|

 ポッドキャスト :
video/mp4
Meshy社Community - MeshyConnect with fellow Meshy enthusiasts, share models, join contests, and stay updated on the latest updates. Join our vibrant community to collaborate, learn, a…
3D生成画面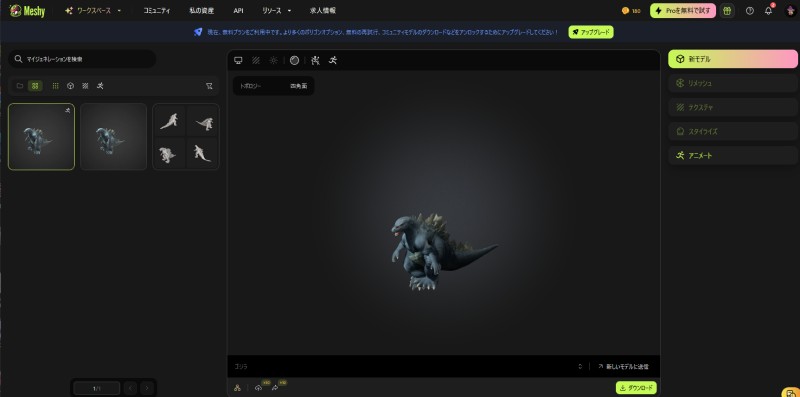
3Dモデル生成AI動画テキストのみで3D動画を生成できました
参考動画 |

|
180000円→100000円 ギャラリー  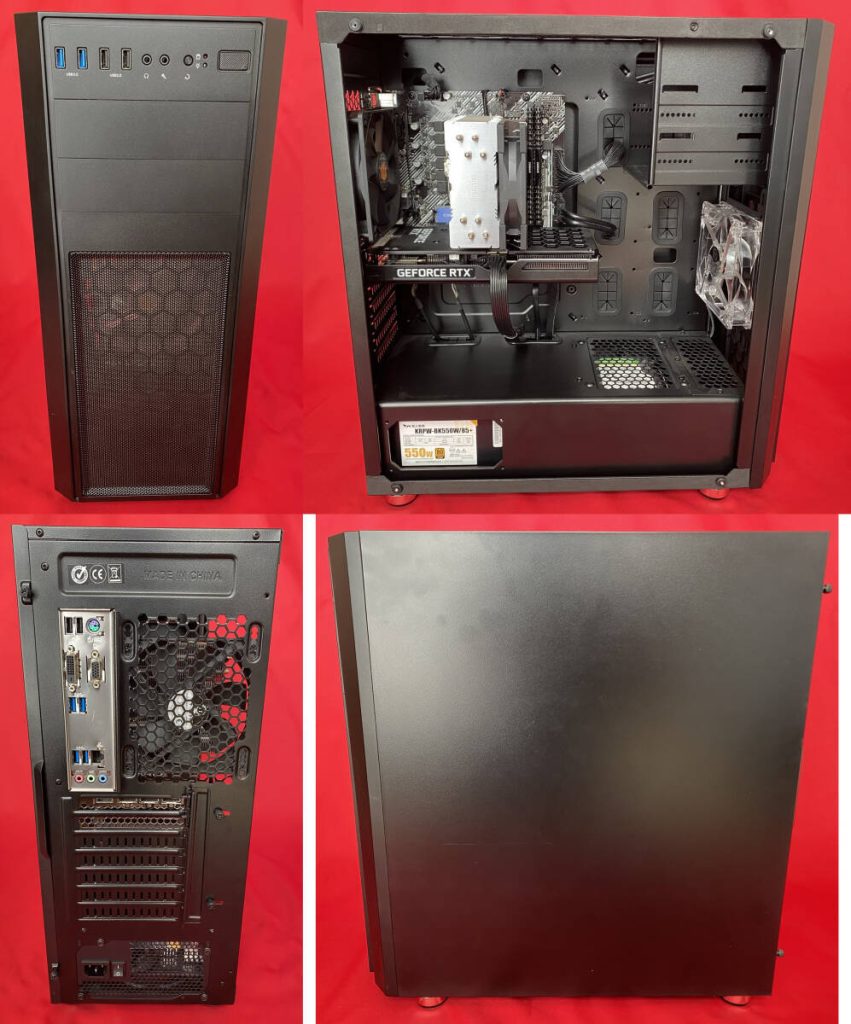 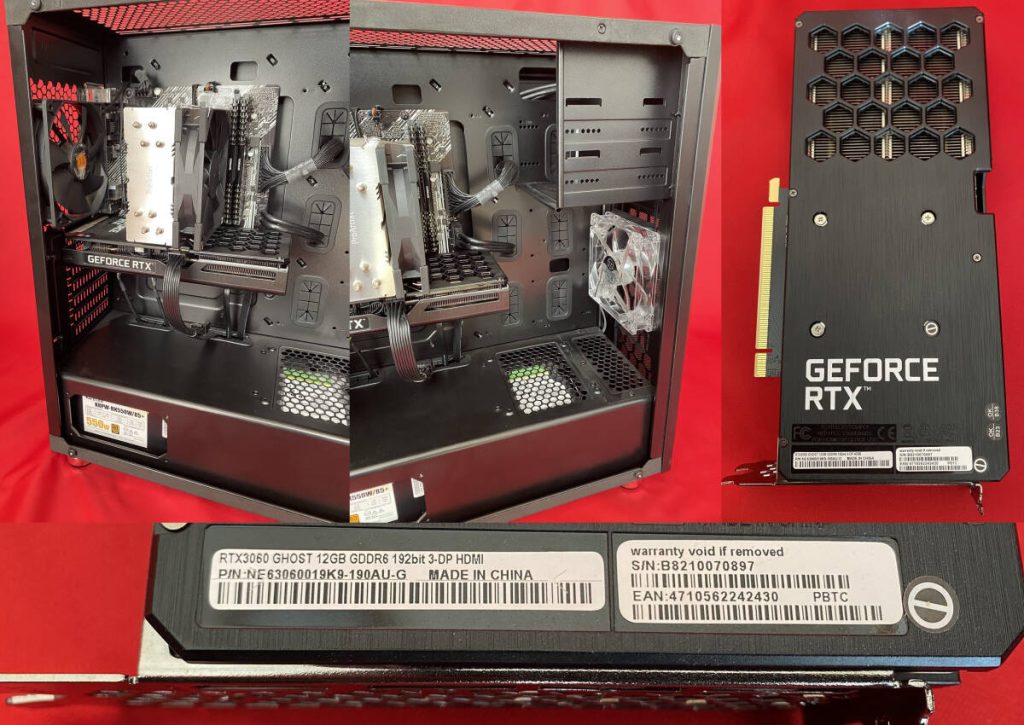 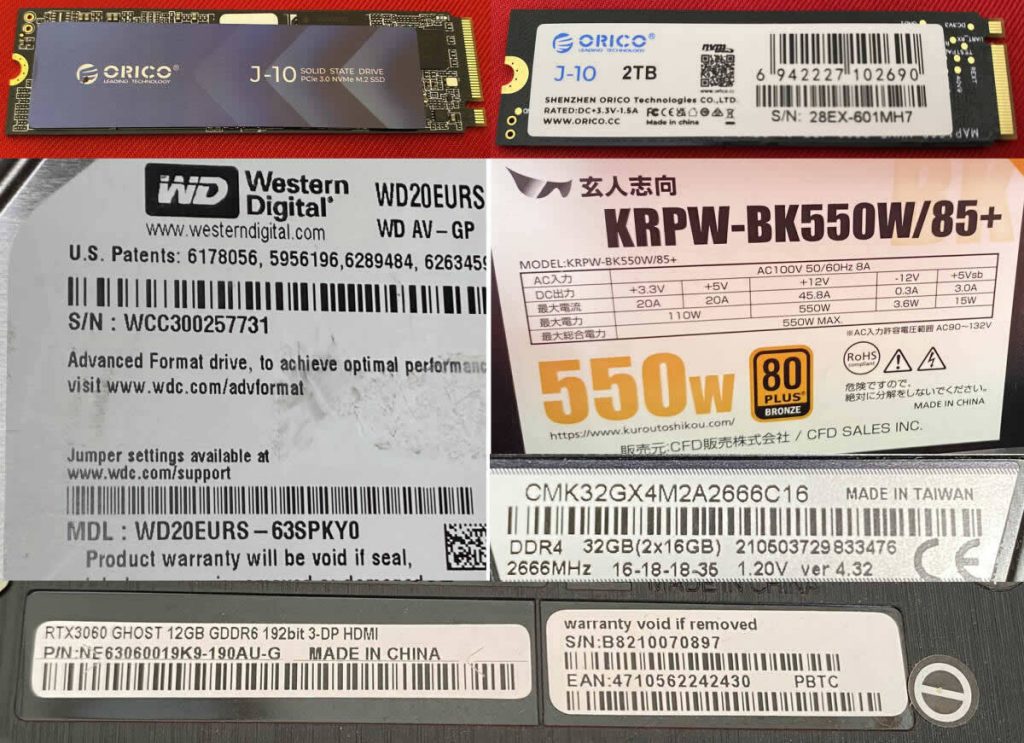  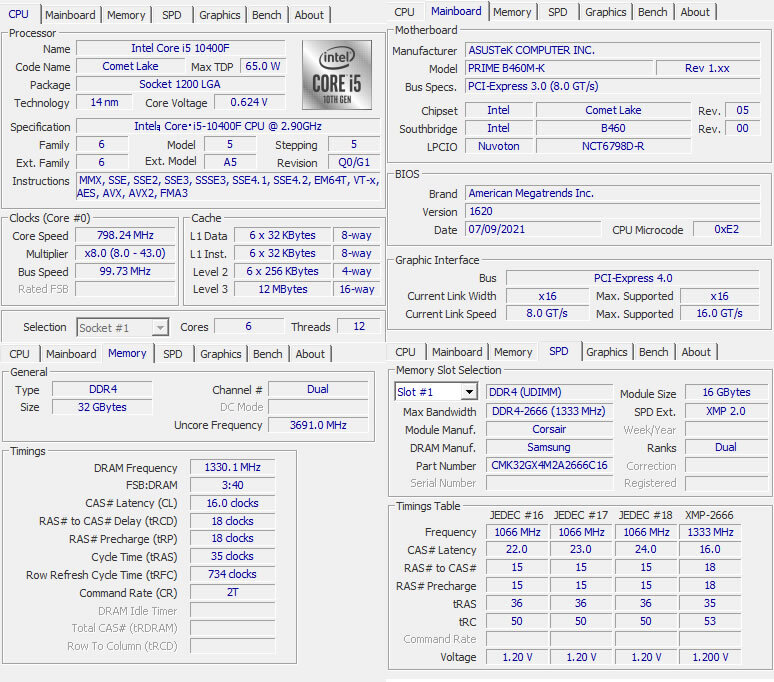
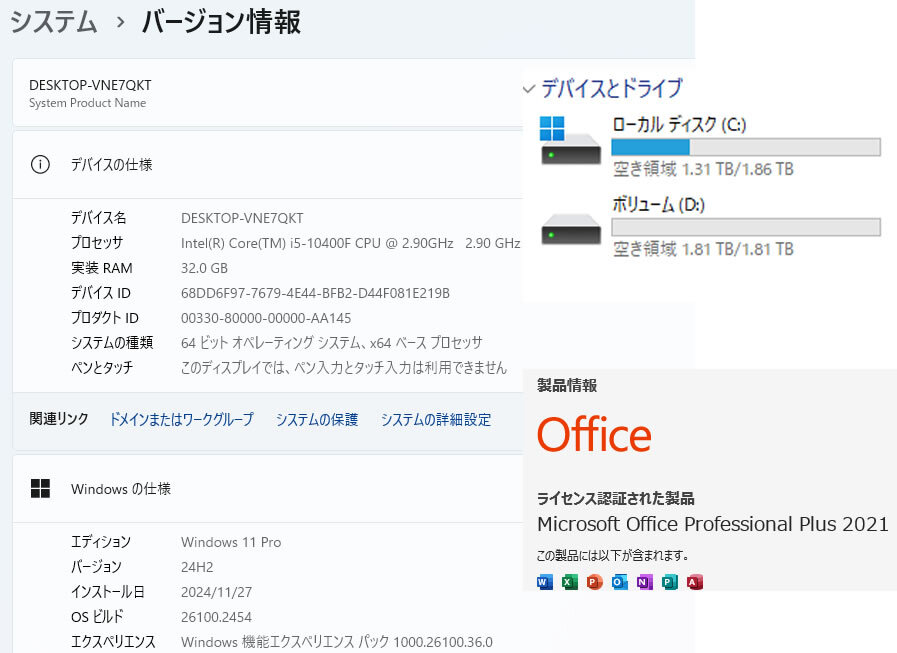
【AI生成:実践動画あり:設定済】PRIME B460M core i5-10400F 32GB SSD:M.2(2TB) HDD(2TB) RTX3060(12GB) (Flux SD Rope Pinokioなど) (※ゲーミングPC AI生成PC) 【ベンチマーク】とても快適 【スペック】 自作PC OS Windows11Pro CPU Intel Core i5-10400F 2.90GHz メモリ CORSAIR CMK32GX4M2A2666C16 DDR4 16GB*2 (32GB) (スロット:2/2) グラフィック Ghost GeForce RTX3060 12GB マザーボード ASUS PRIME B460M-K 電源ユニット 玄人志向 KRPW-BK550W/85+ 550W オフィスソフト MicrosoftOffice2021Pro ネットワーク 有線〇/無線〇 (無線LAN子機【未開封】付) ストレージ SSD(M.2): 2TB (ORICO J10 SSD 2TB) 【新品】 HDD: 2TB (WD WD20EURS) 【中古増設】※Cドライブの読み書き速度を速くしました。 グラフィック RTX3060 GHOST 12GB GDDR6 19bit 3-DP HDMI ※ファン:背面、前面に設置済み(生成速度の低下を抑制します)合計GPUメモリ約20GB(生成する際に使用可能メモリ) :専用GPUメモリ「12GB」、共有GPUメモリ「約8GB」 私見になりますが、パソコンは大変綺麗に使用されていたように感じます。(美品綺麗) グラボもかなり綺麗でした。 ※詳細は、画像でご確認ください。【付属品】 本体、電源コード、無線LAN子機【未開封】 となります。 ※商品到着後、無線LAN子機の設定などをお願いいたします。
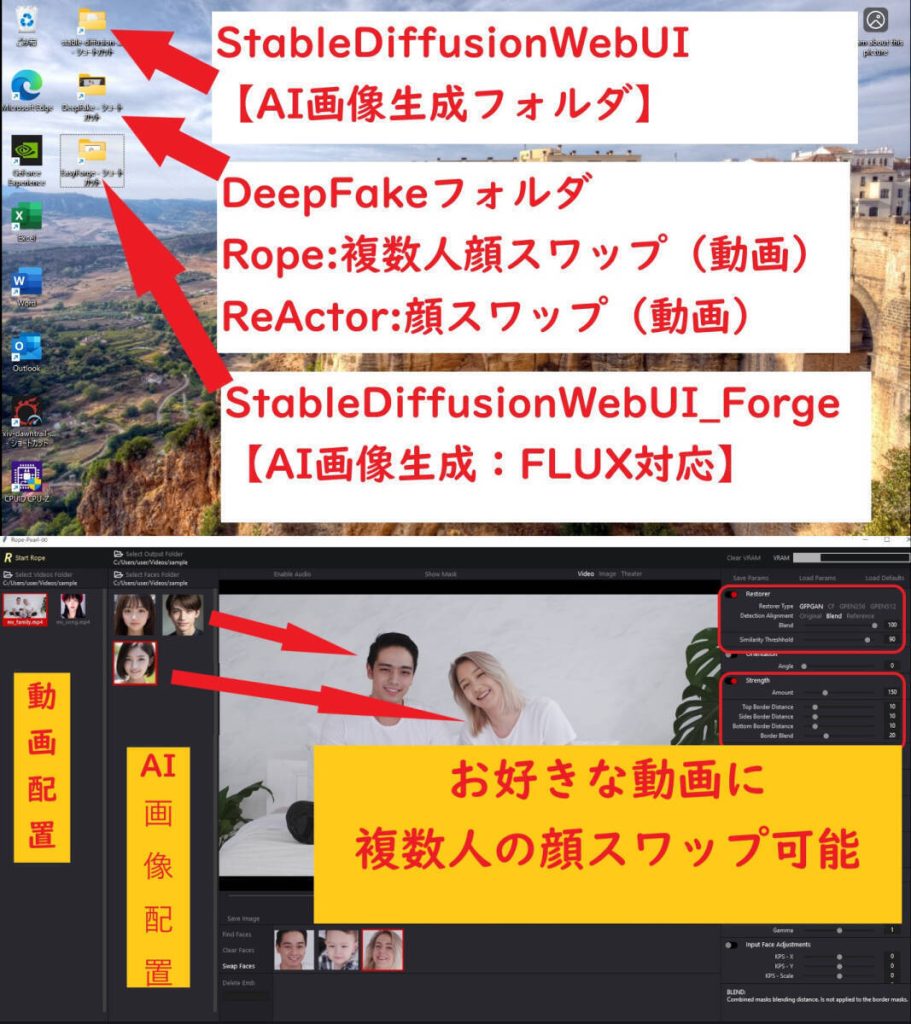
AI画像生成に興味を持たれている方もいるかと思い、出品するにあたり、再構築しました。 【ヤフオク用】AI生成PCの主なソフトの実践動画 ※どのようなAI生成ソフトなのかを確認したい方は、お手数ですが動画をご覧ください ※再生時間:6分程度 AI画像生成 ・WebUI Forge ・Stable Diffusion WebUI AI顔スワップ動画生成 ・Rope ・ReActor-UI Pinokio【AIツール一覧】 ・Stable Diffusion WebUI 【画像生成】 ・CogStudio 【動画生成】 ・ComfyUI 【生成AIアプリケーション】 ・Hallo 【リップシンク】 ローカルPCなので、AI画像、スワップ動画などを無制限に生成することが可能です。 AI生成にご興味を持たれた方などは、ご検討いただけると有難いです。 ↓以下はおまけ程度にお考え下さい AI画像生成 設定済み ●WebUI Forge(AI画像生成) WebUI Forgeインストール済み 最新AI画像生成「FLUX.1」を生成可能 高解像度化を生成してみたい方はこちらをお試しください。 フォルダ内「Forge-user.bat」ダブルクリックで起動 すぐに、AI画像を生成できます!解像度の高いかなり綺麗なAI画像を生成可能です。 ●Stable Diffusion WebUI(AI画像生成) Stable Diffusion WebUI インストール済み CheckPoint インストール済み フォルダ内「webui-user.bat」ダブルクリックで起動 すぐに、AI画像を生成できます!いろいろな画風を楽しみたい方は、LoRAが豊富なこちらをご活用ください。 ・お好きな動画をご用意 ・AIなどで顔画像をご用意 ・複数人の顔スワップが可能 元動画データと変更したい各スワップ顔画像を準備すれば、新しい動画が生成可能 フォルダ内「Rope_setup.bat」ダブルクリックで起動顔スワップの精度がかなり高くなったと感じます。 ●ReActor-UI (ディープフェイク動画生成) 元動画データと変更したいスワップ顔画像を準備すれば、新しい動画が生成可能 フォルダ内「ReActor_setup.bat」ダブルクリックで起動すこし古いソフトとなるため、お試し版としてお使いください。 詳細は、「WebUI Forge」「Stable Diffusion」「Rope」「ReActor-UI」で検索をお願いいたします。 AI生成/スワップ方法なども、検索などでご確認いただけるようにお願いいたします。 ●Pinokio(AIツールの一覧) AIツールをまとめた「 Pinokio 」を導入しました。 いろいろなAI生成ツールを「Pinokio」で管理・操作ができます。 ・Stable Diffusion WebUI 【画像生成】 ・CogStudio 【動画生成】 ・ComfyUI 【生成AIアプリケーション】 ・Hallo 【リップシンク】 ※目的の人物などの画像を20枚程度からLoRaを生成可能 ※StableDiffusionWebUIで目的の人物AI画像を生成可能
●参考資料(AI生成関連) 各AI生成ソフトごとに、簡単な操作方法を記述した説明書を制作しました 参考となるサイトを各フォルダごとに追加 ご興味を持たれた方は、ご検討のほど、よろしくお願いいたします。 ローカルPCに設定する時間がない方などにもお勧めかなと思います。「 Stable Diffusion WebUI
」は1年以上活用していますが、いまだに楽しいです。 お手持ちの動画の出演者の顔をお好きな顔に変更することも可能となります。 私の場合、毎日の人生が一変しました。 (^o^)/ ※LoRaを作成できます(お好きな人物のAI画像などが生成可能)。 詳細は、画像でご確認ください。
お問合せ※商品タイトルを「題名」にコピーして送信してください [contact-form-7]
|

|
180000円→100000円 ギャラリー 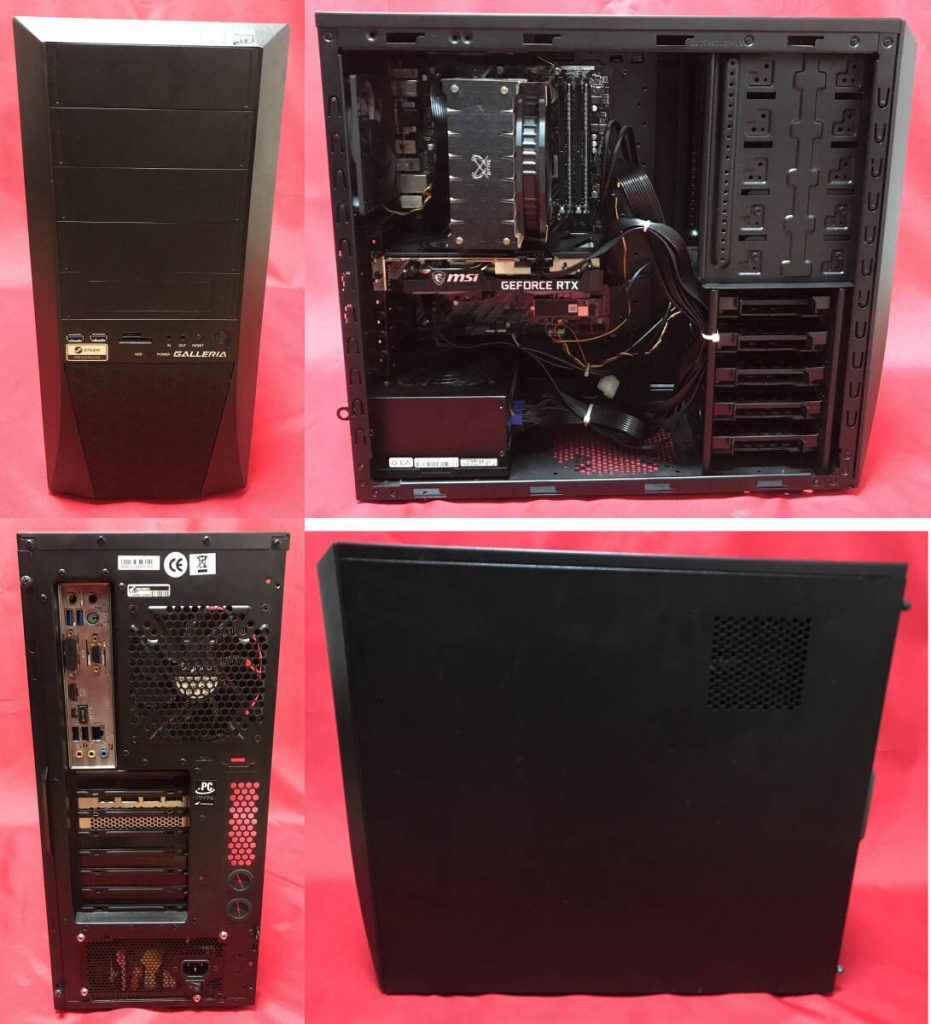 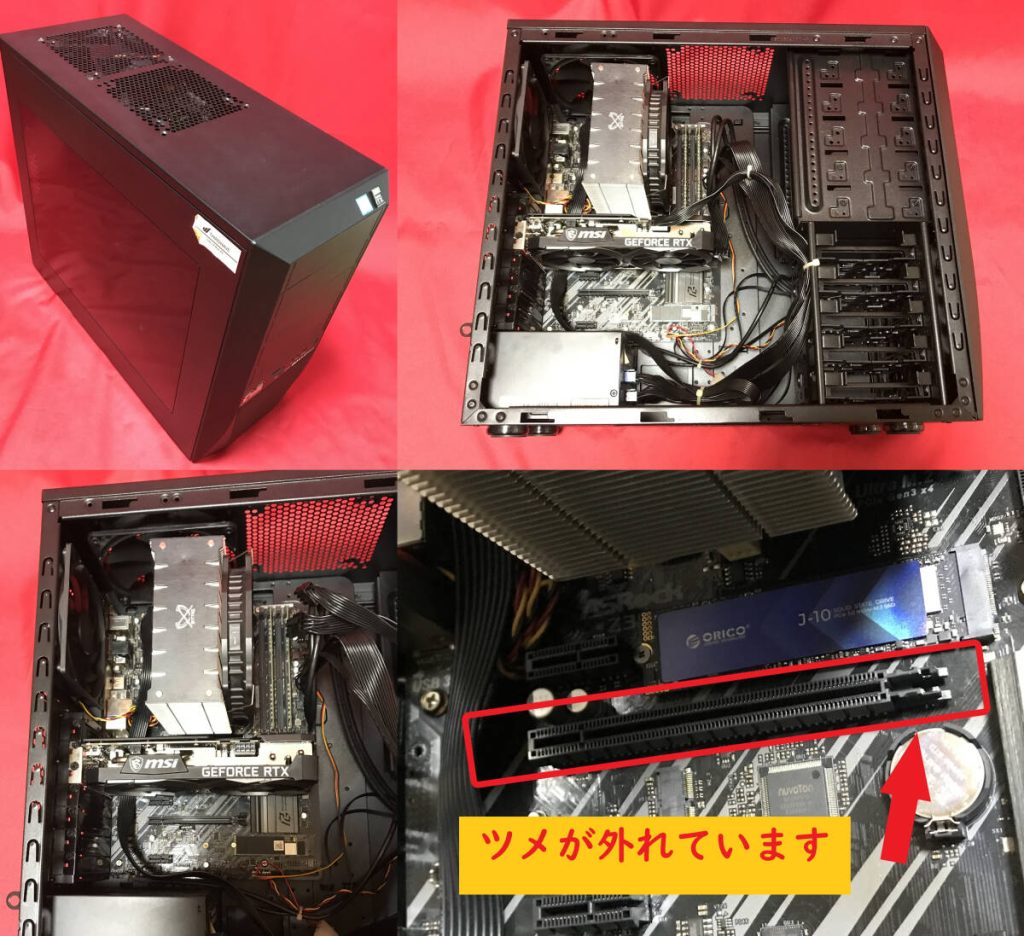 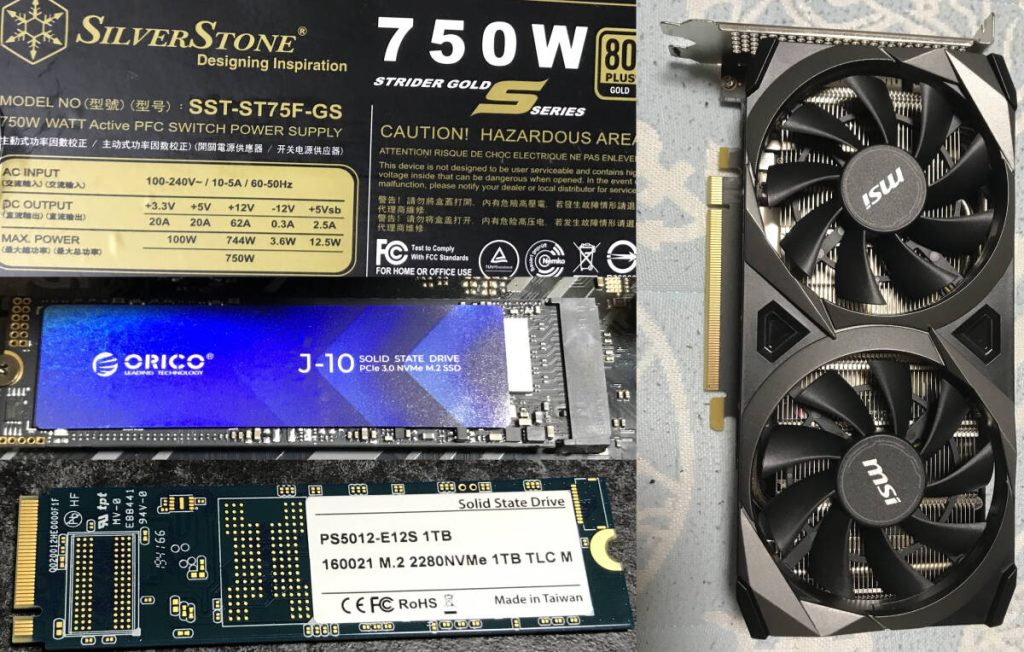 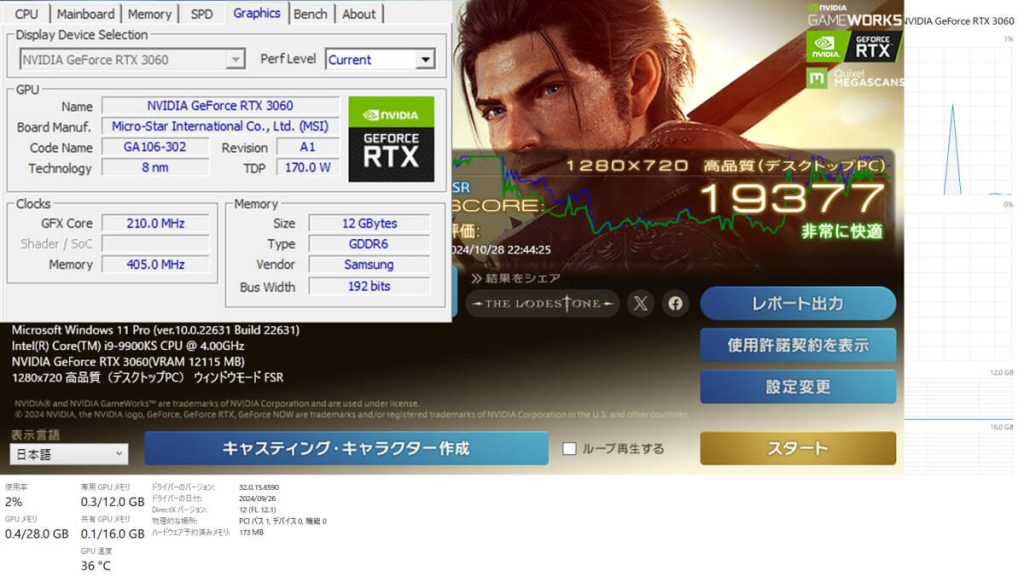 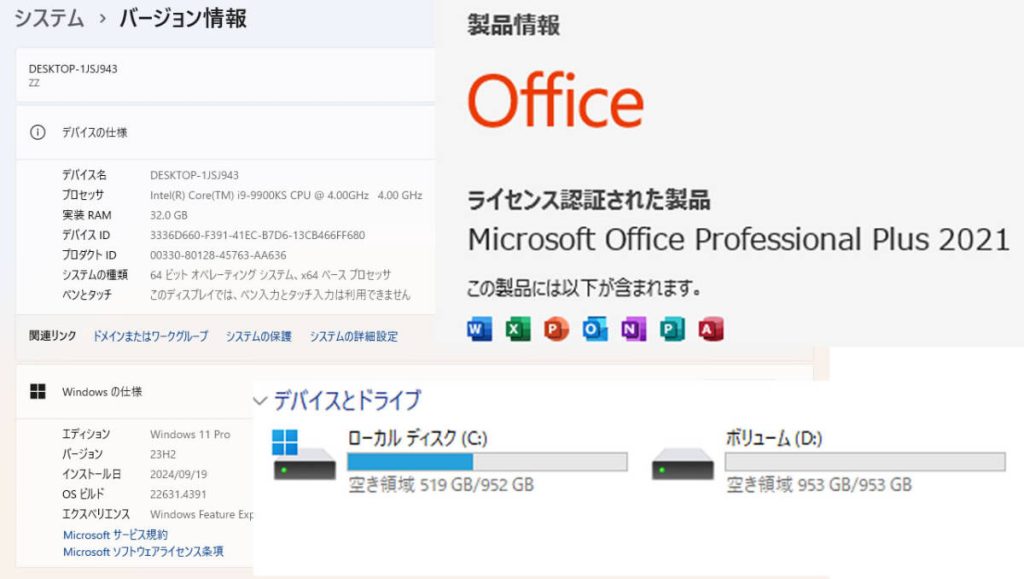 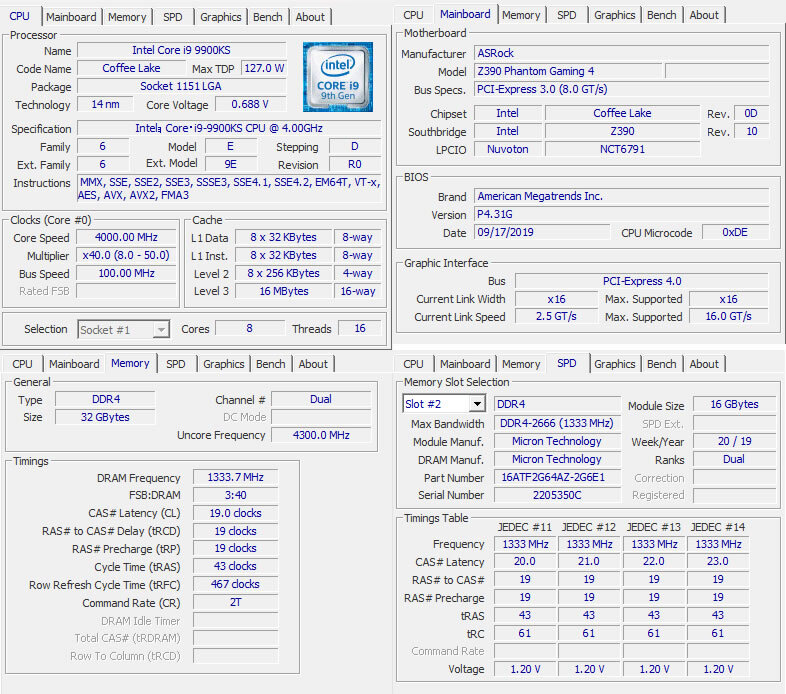
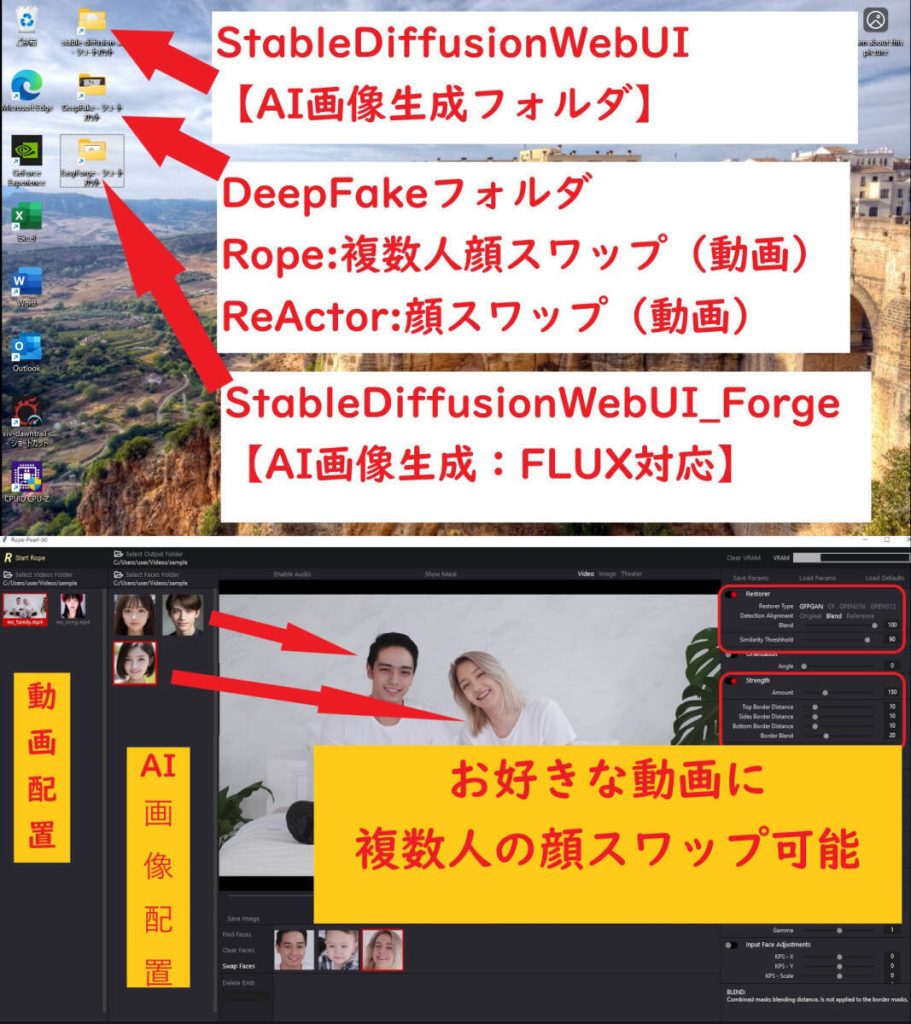 

【AI生成実践動画あり:設定済】 GALLERIA Core-i9 9900KS 32GB SSD:M.2(1TB&1TB) RTX3060(12GB) (Flux SD Rope Pinokioなど) 【訳あり】 (※ゲーミングPC AI生成PC) 【ベンチマーク】非常に快適 【スペック】 筐体 Thirdwave シリーズ GALLERIA OS Windows11Pro CPU Core-i9 9900KS CPU @ 4.00GHz メモリ Micron DDR4 16GB×2 (32GB) (スロット:2/4) グラフィック GeForce RTX3060 VENTUS 12GB マザーボード ASRock Z390 Phantom Gaming 4 電源ユニット SilverStone SST-ST75F-GS 750W オフィスソフト MicrosoftOffice2021Pro ネットワーク 有線〇/無線〇 (無線LAN子機【未開封】付) ストレージ SSD(M.2): 1TB (ORICO J-10 1TB) 【新品】 SSD(M.2): 1TB (PHISON PS5012-E12S 1TB) グラフィック GeForce RTX3060 VENTUS 12GB 【綺麗】 ※ファン:背面、前面、上面などに複数設置済み(生成速度の低下を抑制します)合計GPUメモリ約28GB(生成する際に使用可能メモリ) :専用GPUメモリ「12GB」、共有GPUメモリ「16GB」 パソコンは、経年に合わせた状態のように感じます。 RTX 3060は大変綺麗な状態に思えます。 【訳あり】 PCIeスロットのツメが外れています。(1ヶ所) ※PCI-Express拡張カードを差し込むスロットの片方のツメがありません。 現在、グラフィックカードが取り付けてあります。 グラボがそれほど重くもなく、ネジで固定されているので外れることはないと思います。 AI生成するパソコンとしてはスペックの高いパソコンとなります。 インテルは数世代前のCPUから、最高位モデルとして「KS」バージョンを用意しています。 生産したCPUの中から特に高速なものを選別したもので、通常はその世代のCPU発売後しばらくしてから、 限られた数量しか販売されないとのことです。私もAI生成するパソコンにいろいろなCPUを試してみましたが、「KS」バージョンが一番安定しています。※現在 「KS」バージョンを使用しています。もしよろしければ、「KS」バージョンをご確認のうえ、ご検討いただけると有難いです。 ※詳細は、画像でご確認ください。【付属品】 本体、電源コード、無線LAN子機【未開封】 となります。 ※商品到着後、無線LAN子機の設定などをお願いいたします。 AI画像生成に興味を持たれている方もいるかと思い、出品するにあたり、再構築しました。 【ヤフオク用】AI生成PCの主なソフトの実践動画 ※どのようなAI生成ソフトなのかを確認したい方は、お手数ですが動画をご覧ください ※再生時間:6分程度 AI画像生成 ・WebUI Forge ・Stable Diffusion WebUI AI顔スワップ動画生成 ・Rope ・ReActor-UI Pinokio【AIツール一覧】 ・Stable Diffusion WebUI 【画像生成】 ・CogStudio 【動画生成】 ・ComfyUI 【生成AIアプリケーション】 ・Hallo 【リップシンク】 ローカルPCなので、AI画像、スワップ動画などを無制限に生成することが可能です。 AI生成にご興味を持たれた方などは、ご検討いただけると有難いです。 ↓以下はおまけ程度にお考え下さい AI画像生成 設定済み ●WebUI Forge(AI画像生成) WebUI Forgeインストール済み 最新AI画像生成「FLUX.1」を生成可能 高解像度化を生成してみたい方はこちらをお試しください。 フォルダ内「Forge-user.bat」ダブルクリックで起動 ?すぐに、AI画像を生成できます!解像度の高いかなり綺麗なAI画像を生成可能です。 ●Stable Diffusion WebUI(AI画像生成) Stable Diffusion WebUI インストール済み CheckPoint インストール済み フォルダ内「webui-user.bat」ダブルクリックで起動 ?すぐに、AI画像を生成できます!いろいろな画風を楽しみたい方は、LoRAが豊富なこちらをご活用ください。 ・お好きな動画をご用意 ・AIなどで顔画像をご用意 ・複数人の顔スワップが可能 元動画データと変更したい各スワップ顔画像を準備すれば、新しい動画が生成可能 フォルダ内「Rope_setup.bat」ダブルクリックで起動顔スワップの精度がかなり高くなったと感じます。 ●ReActor-UI (ディープフェイク動画生成) 元動画データと変更したいスワップ顔画像を準備すれば、新しい動画が生成可能 フォルダ内「ReActor_setup.bat」ダブルクリックで起動すこし古いソフトとなるため、お試し版としてお使いください。 詳細は、「WebUI Forge」「Stable Diffusion」「Rope」「ReActor-UI」で検索をお願いいたします。 AI生成/スワップ方法なども、検索などでご確認いただけるようにお願いいたします。 ●Pinokio(AIツールの一覧) AIツールをまとめた「 Pinokio 」を導入しました。 いろいろなAI生成ツールを「Pinokio」で管理・操作ができます。 ・Stable Diffusion WebUI 【画像生成】 ・CogStudio 【動画生成】 ・ComfyUI 【生成AIアプリケーション】 ・Hallo 【リップシンク】 ※目的の人物などの画像を20枚程度からLoRaを生成可能 ?※StableDiffusionWebUIで目的の人物AI画像を生成可能
●参考資料(AI生成関連)?各AI生成ソフトごとに、簡単な操作方法を記述した説明書を制作しました?参考となるサイトを各フォルダごとに追加 ご興味を持たれた方は、ご検討のほど、よろしくお願いいたします。 ローカルPCに設定する時間がない方などにもお勧めかなと思います。「 Stable Diffusion WebUI
」は1年以上活用していますが、いまだに楽しいです。 お手持ちの動画の出演者の顔をお好きな顔に変更することも可能となります。 私の場合、毎日の人生が一変しました。?(^o^)/ ※LoRaを作成できます(お好きな人物のAI画像などが生成可能)。 詳細は、画像でご確認ください。
お問合せ※商品タイトルを「題名」にコピーして送信してください [contact-form-7]
|

|
200000円→120000円 ギャラリー 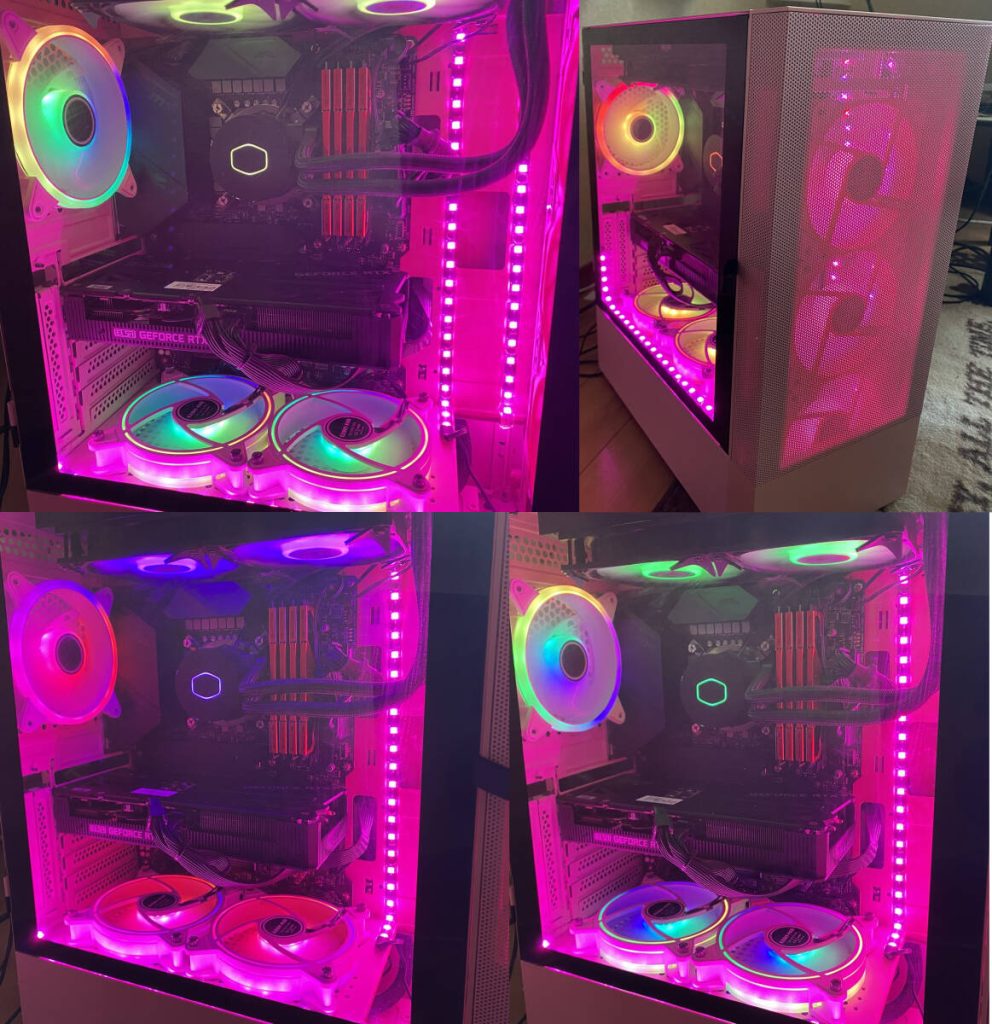 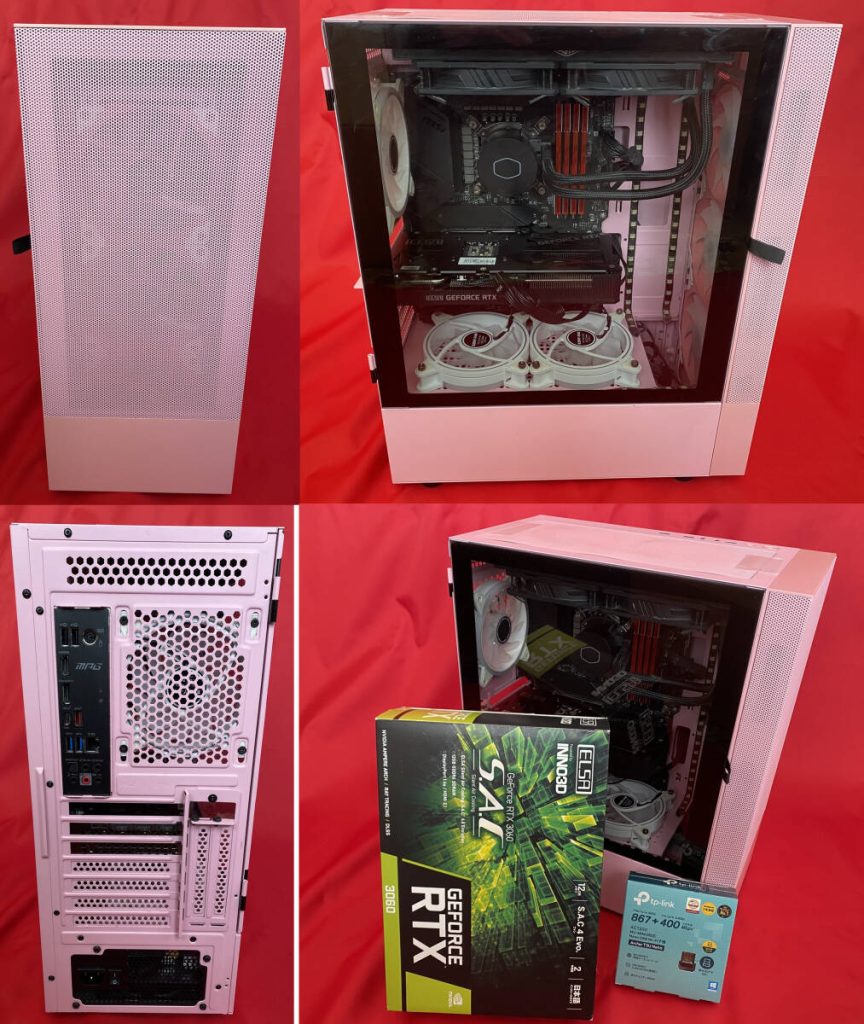 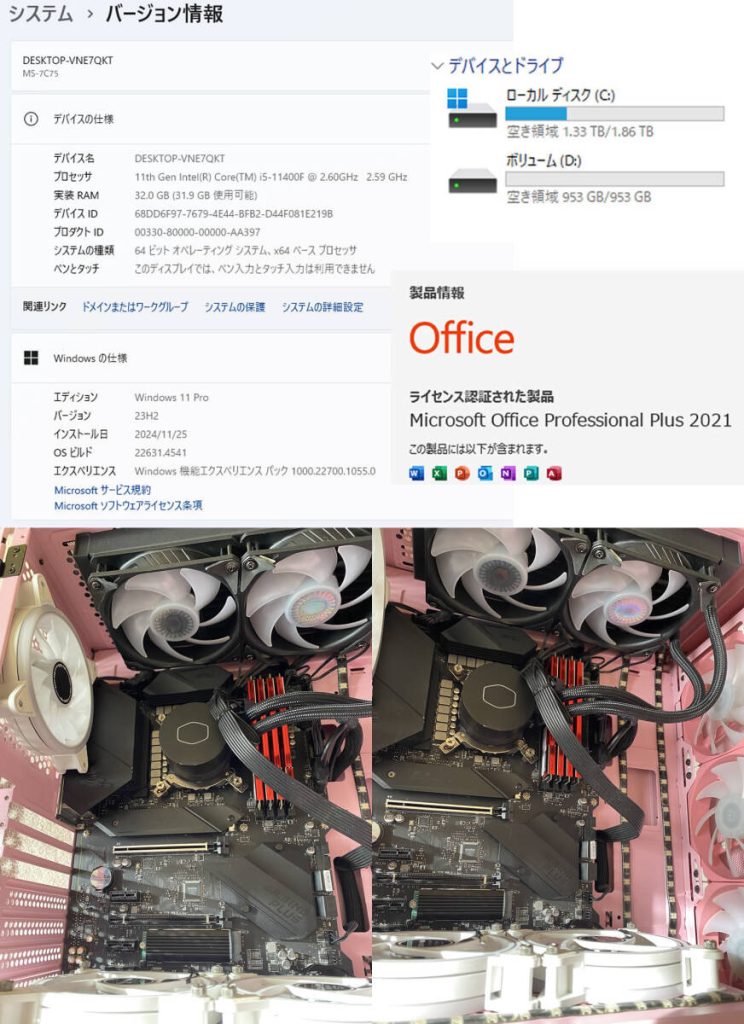 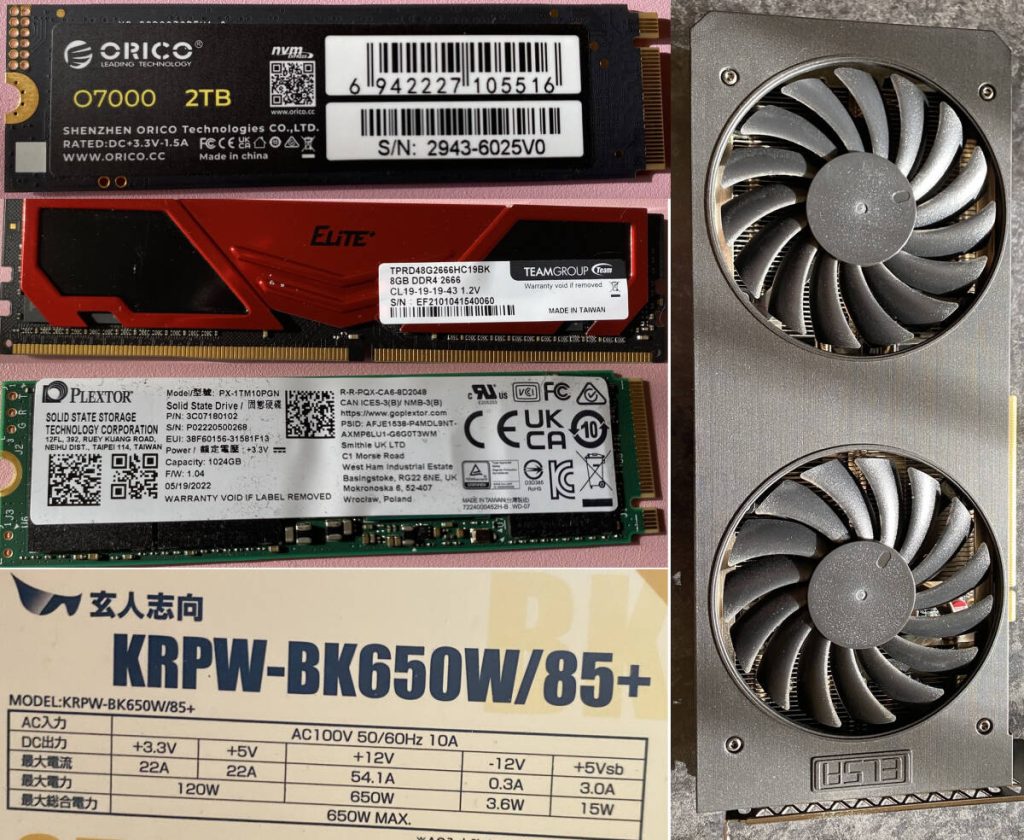 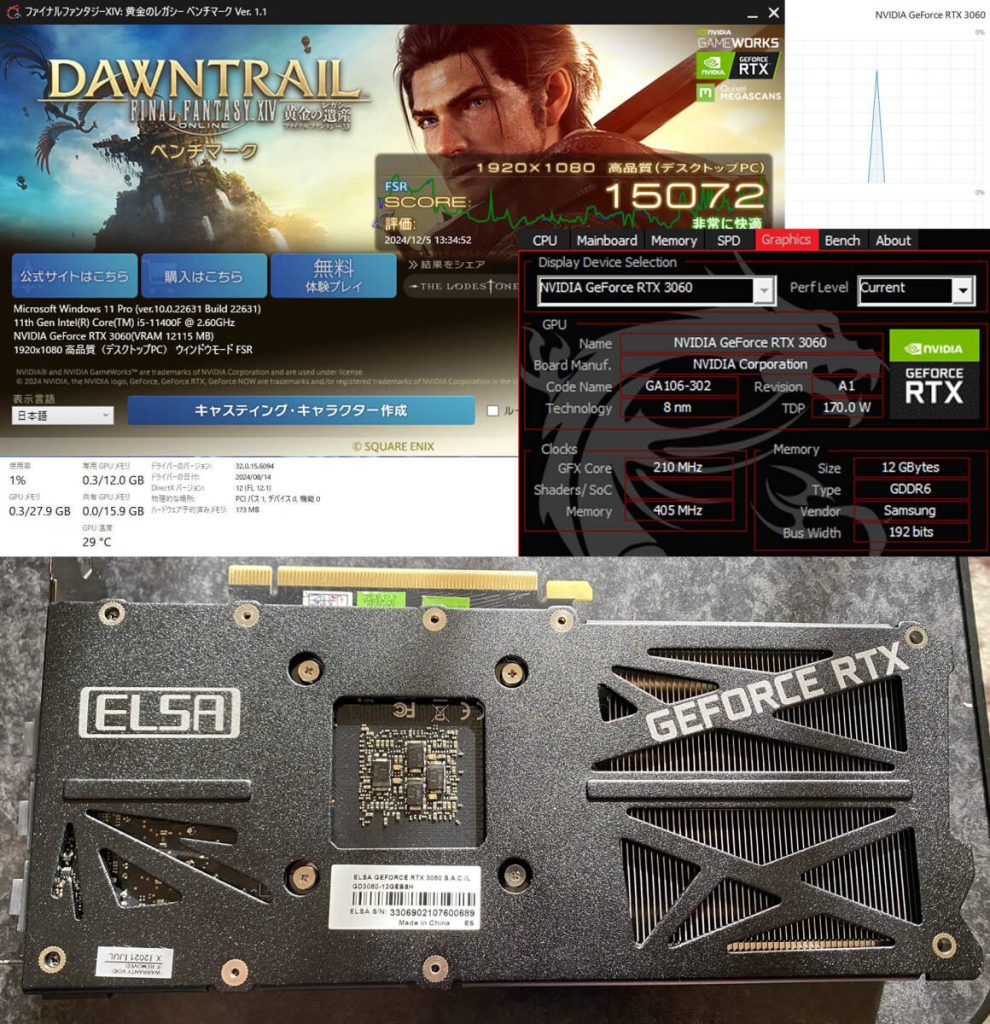 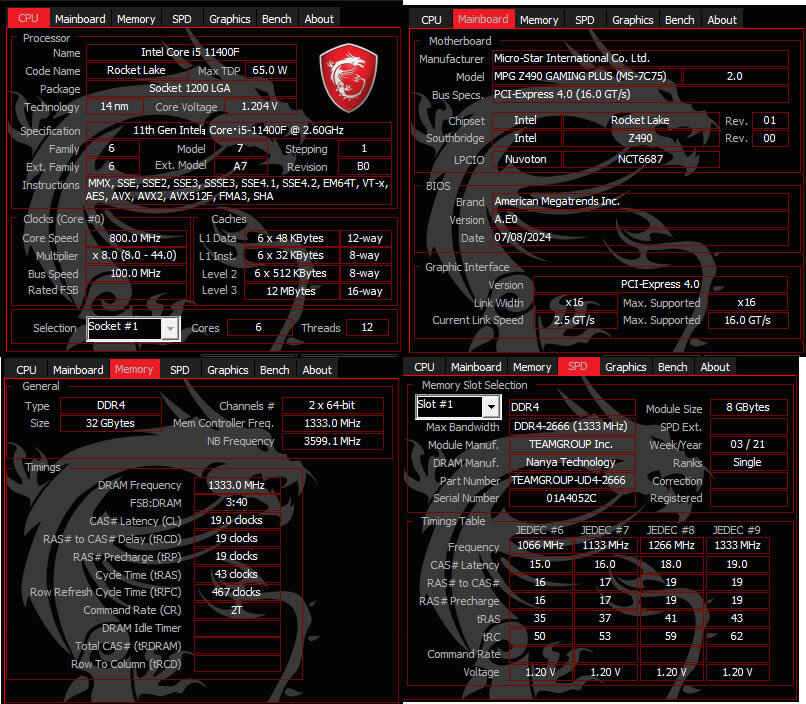 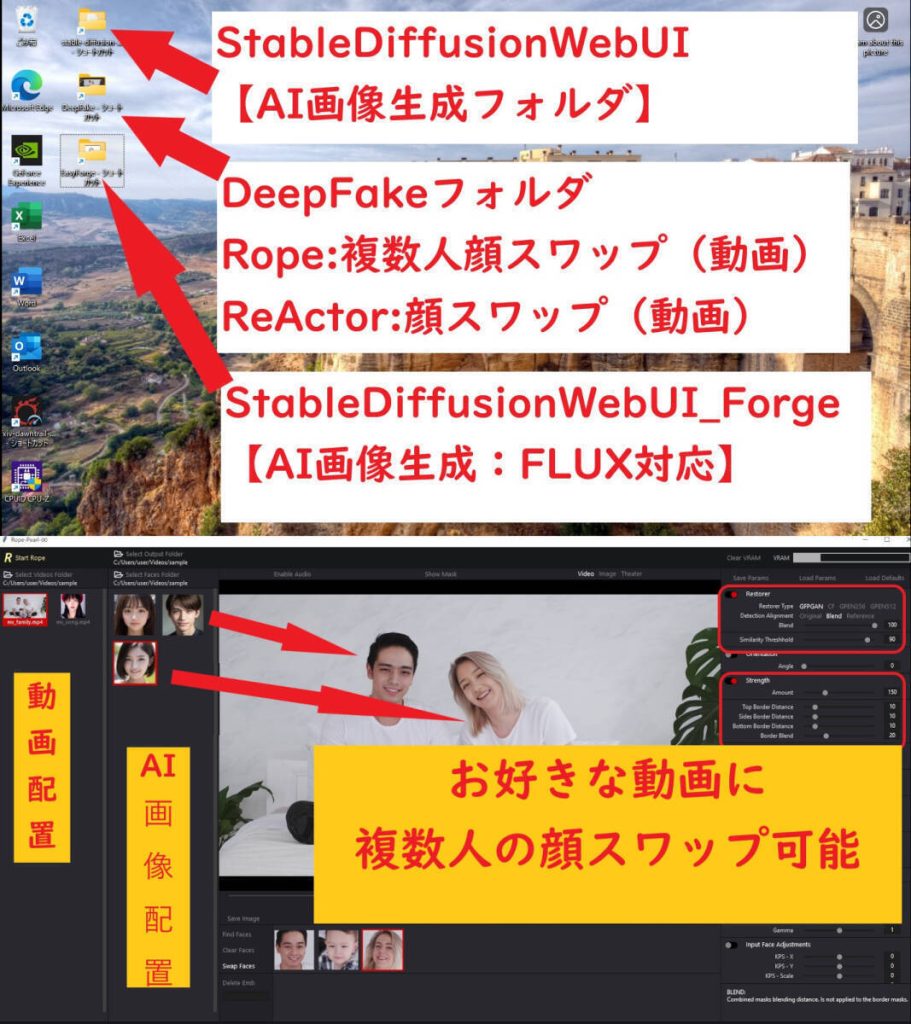  
【AI画像/動画生成 設定済】MPG Z490 core i5-11400F 32GB SSD:M.2(計3TB) RTX3060(12GB) 簡易水冷CPUクーラー (Flux SD Rope Pinokioなど) ※淡い薄いピンク色の筐体となります。 ※ファンや内部ライトなどの照明効果が綺麗です (※ゲーミングPC AI生成PC) 【ベンチマーク】非常に快適 【スペック】 OS Windows11Pro CPU Intel Core i5-11400F @ 2.60GHz メモリ TEAMGROUP ELITE DDR4-2666MHz 8GB×4 (32GB) (スロット:4/4) グラフィック エルザ GeForce RTX3060 12GB マザーボード MPG Z490 GAMING PLUS (MS-7C75) 電源ユニット KRPW-BK650W/85+ 650W オフィスソフト MicrosoftOffice2021Pro ネットワーク 有線〇/無線〇 (無線LAN子機【未開封】付) cooler master製 簡易水冷CPUクーラー サイドパネル開閉可能なピンクのPCケース ストレージ SSD(M.2): 2TB (ORICO O7000 Gen4 2TB) 【新品増設】 SSD(M.2): 1TB (PLEXTOR PX-1TM10PGN 1TB) 【中古増設】 ORICO O7000 2TB NVMe SSD、SLCキャッシ 3D NAND NVMe? PCIe4.0 M.2 SSD R:7000MB/s W:4700MB/s グラフィック エルザ GeForce RTX 3060 グラフィックスボード S.A.C/L GD3060-12GERSH HDMI*1/DP*3 ※ファン:背面、前面(3連ファン)、上部(2連ファン)、下部(2連ファン)などに複数設置済み(生成速度の低下を抑制します)合計GPUメモリ約28GB(生成する際に使用可能メモリ) :専用GPUメモリ「12GB」、共有GPUメモリ「約16GB」 私見になりますが、パソコンはある程度綺麗に使用されていたように感じます。 ※多少ですが、傷や汚れも見られます Cドライブを新品のPCIe4(PCIe4.0) M.2に変更しました。 増設したRTX 3060は、綺麗でかっこいいと思います。 ※詳細は、画像でご確認ください。【付属品】 本体、電源コード、グラボ空き箱、無線LAN子機【未開封】 となります。 ※商品到着後、無線LAN子機の設定などをお願いいたします。 AI画像生成に興味を持たれている方もいるかと思い、出品するにあたり、再構築しました。 【ヤフオク用】AI生成PCの主なソフトの実践動画 ※どのようなAI生成ソフトなのかを確認したい方は、お手数ですが動画をご覧ください ※再生時間:6分程度 ※URLをコピーして、ご覧ください AI画像生成 ・WebUI Forge ・Stable Diffusion WebUI AI顔スワップ動画生成 ・Rope ・ReActor-UI Pinokio【AIツール一覧】 ・Stable Diffusion WebUI 【画像生成】 ・CogStudio 【動画生成】 ・ComfyUI 【生成AIアプリケーション】 ・Hallo 【リップシンク】 ローカルPCなので、AI画像、スワップ動画などを無制限に生成することが可能です。 AI生成にご興味を持たれた方などは、ご検討いただけると有難いです。 ↓以下はおまけ程度にお考え下さい AI画像生成 設定済み ●WebUI Forge(AI画像生成) WebUI Forgeインストール済み 最新AI画像生成「FLUX.1」を生成可能 高解像度化を生成してみたい方はこちらをお試しください。 フォルダ内「Forge-user.bat」ダブルクリックで起動 すぐに、AI画像を生成できます!解像度の高いかなり綺麗なAI画像を生成可能です。 ●Stable Diffusion WebUI(AI画像生成) Stable Diffusion WebUI インストール済み CheckPoint インストール済み フォルダ内「webui-user.bat」ダブルクリックで起動 ?すぐに、AI画像を生成できます!いろいろな画風を楽しみたい方は、LoRAが豊富なこちらをご活用ください。 ・お好きな動画をご用意 ・AIなどで顔画像をご用意 ・複数人の顔スワップが可能 元動画データと変更したい各スワップ顔画像を準備すれば、新しい動画が生成可能 フォルダ内「Rope_setup.bat」ダブルクリックで起動顔スワップの精度がかなり高くなったと感じます。 ●ReActor-UI (ディープフェイク動画生成) 元動画データと変更したいスワップ顔画像を準備すれば、新しい動画が生成可能 フォルダ内「ReActor_setup.bat」ダブルクリックで起動すこし古いソフトとなるため、お試し版としてお使いください。 詳細は、「WebUI Forge」「Stable Diffusion」「Rope」「ReActor-UI」で検索をお願いいたします。 AI生成/スワップ方法なども、検索などでご確認いただけるようにお願いいたします。 ●Pinokio(AIツールの一覧) AIツールをまとめた「 Pinokio 」を導入しました。 いろいろなAI生成ツールを「Pinokio」で管理・操作ができます。 ・Stable Diffusion WebUI 【画像生成】 ・CogStudio 【動画生成】 ・ComfyUI 【生成AIアプリケーション】 ・Hallo 【リップシンク】 ※目的の人物などの画像を20枚程度からLoRaを生成可能 ?※StableDiffusionWebUIで目的の人物AI画像を生成可能
●参考資料(AI生成関連)?各AI生成ソフトごとに、簡単な操作方法を記述した説明書を制作しました?参考となるサイトを各フォルダごとに追加 ご興味を持たれた方は、ご検討のほど、よろしくお願いいたします。 ローカルPCに設定する時間がない方などにもお勧めかなと思います。 「 Stable Diffusion WebUI 」は1年以上活用していますが、いまだに楽しいです。 動画の演者の顔をお好きな顔に変更することも可能となります。 ※ローカルPCならではの醍醐味があります。 私の場合、毎日の人生が一変しました。?(^o^)/ ※LoRaを作成できます(お好きな人物のAI画像などを生成可能)。 詳細は、画像でご確認ください。
お問合せ※商品タイトルを「題名」にコピーして送信してください [contact-form-7]
|

|
年末年始の営業時間 12月30日(月)より1月4日まで休業 1月から営業時間は午前10時?午後7時に変更 宜しくお願いいたします ...
|

|
今日は氷室一哉さんのキャンペーンでした。今回の曲は「流浪の町で」という曲です。氷室君には粋な感じでピッタリの曲と思いました。会長が健在の時はいつもご一緒でしたが?きっと遠くの空から見守って、そして応援して下さっている事と思います。ファンの方もいつもの顔ぶれで、ずっと応援してくれると思います。新曲頑張って下さいね。...
|


